Urushi Pearl Project
Updated 8.31.2010 – The Project is Complete.
The Edison Pen Company is proud to announce a collaborative project with Ernest Shin, of Hakumin Urushi Kobo.
For more background, please read this blog entry.
Twenty Limited Edition Pearls are currently in production.
The particular lacquer technique to be used with these pens is called Karanuri, one of several techniques considered Tsugaru-nuri. After the meticulous application of the first layers of lacquer (the same used for standard unadorned Urushi pieces), an uneven layer of lacquer is applied using a mixture of urushi and egg whites, which is a sticky, gel-like mixture that resists running and dripping prior to curing. The mixture is carefully applied ensuring that the texture is pronounced enough to create the desired patterns while not too thick to avoid the wrinkles typically caused by curing an overly thick layer of lacquer.
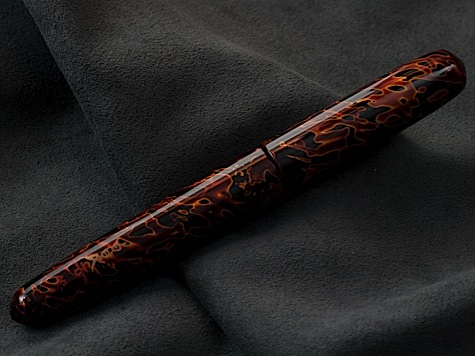
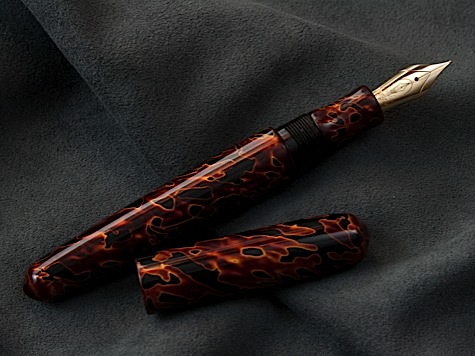
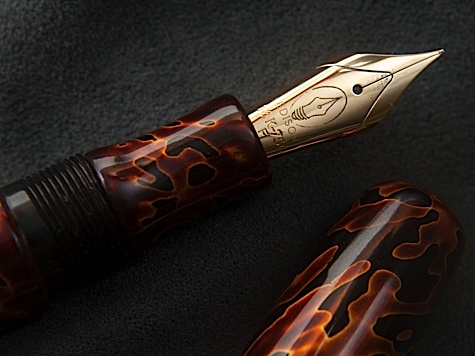
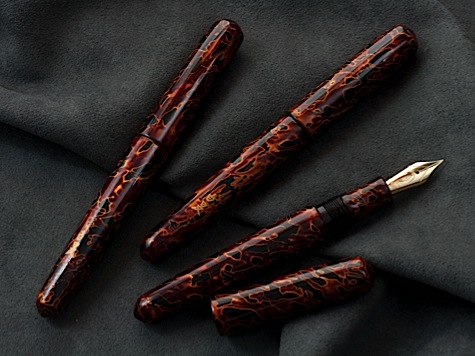
The pen will be a clipless Pearl made from ebonite, with an 18k gold nib. The nib can be F, M, or B. I can also customize the nib to any specification. The filling system will be a cartridge/converter and/or eyedropper in the same pen.
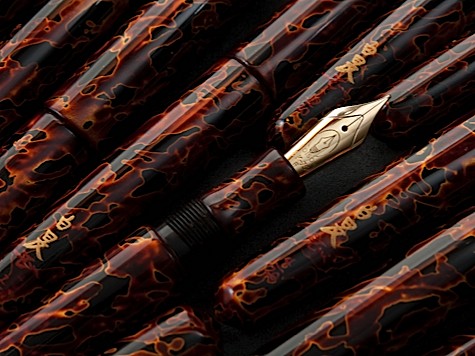
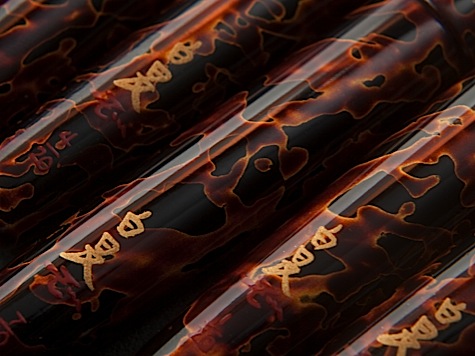
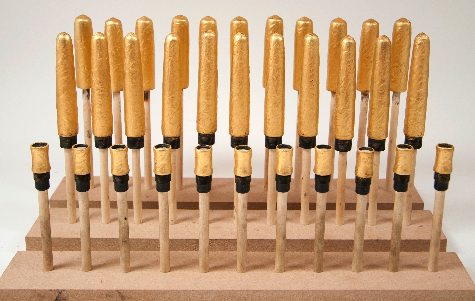
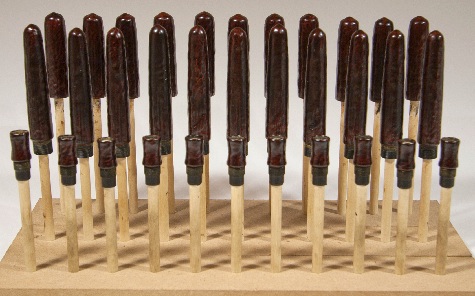
Below are photos showing examples of the Tsugaru-nuri technique by Hakumin Urushi that will be used on the Pearls….
.jpg)
.jpg)
.jpg)
sharp.jpg)
So the Pearls will have a finish very similar to what you see above.
Price of the pen will is $850. In order to reserve a pen, I will require $250 in earnest money. Since the project requires 4 months, customers can pay an additional $200 per month, or pay the balance upon completion.
The limited edition is going to be twenty pens.
ALL PENS ARE SOLD. If you are interested, email me to be placed on a waiting list, just in case a buyer cancels. The first run of 10 pens will be available for shipping around August. The second run of 10 pens will be a month behind the first run, so it will be available around September. This Limited Edition will not be expanded beyond 20.
If you would like to bookmark this page, progress photos are below, and the entire process will be documented and updated on a regular basis.
4.1.10 – The bore and interior threads are completed.
.jpg)
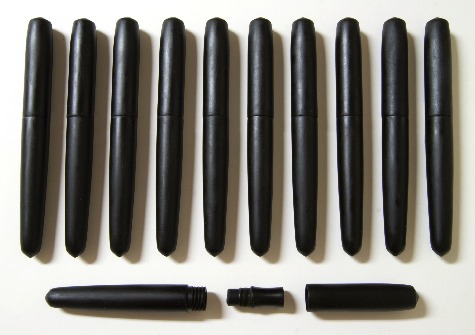
4.5.10 – The exterior is rough cut off the lathe, still showing toolmarks.
.jpg)
4.8.10 – The pens are rough sanded, and ready to go to Hakumin Urushi Kobo for lacquer application.
.jpg)
4.28.10
Ebonite Ji: Ebonite ground (foundation). The unlacquered pens are prepared for the urushi application by thoroughly washing the pens in water and detergent to remove any grease from fingerprints or lubricants used during turning. The pens are thoroughly dried.

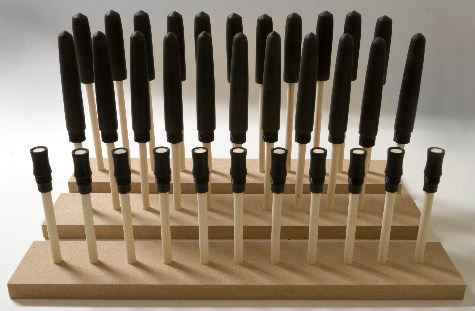
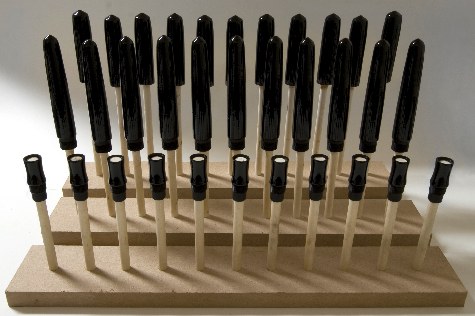
4.29.10
Ebonite Ji: Photo of the unlacquered pens mounted and ready for lacquering. The parts are carefully fitted onto wooden dowels which will be what is held during the lacquer process when the lacquer is wet. The dowels are then fitted into a base. The parts will be removed or mounted as needed during the lacquer process.
4.30.10
Ebonite Gatame: Ebonite hardening. The first layer of lacquer. Ki-urushi (raw lacquer) is vigorously rubbed into the surface of the ebonite impregnate the surface thoroughly. Excess lacquer is wiped off and the pens are cured for a day in the furo (curing cabinet). When used with a wood substrate, this process is used to harden and seal the wood surface and to prevent absorption of subsequent layers of lacquer, but with ebonite, which doesn’t need hardening or sealing it helps subsequent layers of lacquer adhere better over the long run.
5.1.10
Ebonite Gatame: Second layer of another layer of ki-urushi is applied to the surface then wiped off. Cured for one day in the furo.

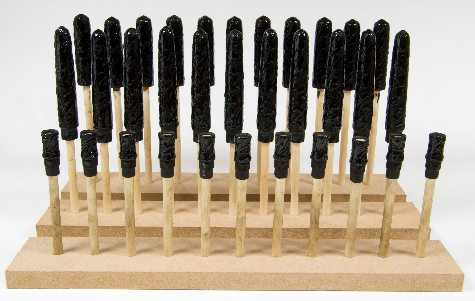
5.2.10
Nakanuri Wet: The first layer of the naka-nuri (middle layers). This is the first of the 9 coats of naka-nuri that will be applied. These layers are applied to give substance and strength to the lacquerwork prior to applying the upper layers and/or decorative layers. The photo is of the freshly applied kuro-naka-nuri-urushi (black middle layer lacquer) prior to to curing. Kuro-naka-nuri-urushi is a middle quality black lacquer made by adding iron hydroxide to transparent lacquer. A chemical reaction changes the color of the lacquer without significantly changing the consistency the way pigments would. After carefully applying an even layer of urushi, the pens are mounted to the base and left to sit for about 30 minutes. At this point, most of the brushstrokes will have settled, and bubbles from the brushing will have disappeared. Any significant particles of dust are then carefully removed with a sharp tool as these particles may prevent the layer from curing evenly. The layer is then cured in the furo for a day.
5.19.10
The following are photos showing the pens going through the 9 layers of the Nakunuri stage.
Lacquer is cured….
Lacquer is sanded….
This process of "cured" and "sanded" occurs nine times, as mentioned previously.
5.23.10
After the 9th layer is finally sanded smooth, the pens are ready for the next step.
Shibo Urushi Wet – The shibo urushi step is the first step that is unique to the the decorative technique for these pens. The technique involves applying a layer of shibo-urushi unevenly. Shibo urushi is urushi mixed with a stiffener, or thickener, which in this case is egg whites. Once the egg whites are thoroughly mixed in to the lacquer, it is traditionally applied with a special perforated spatula. However, to give the completed pen a distinctive look, The shibo-urushi on these pens were applied with a palette knife. This process has been documented in the following videos.
Mixing the Shibo-Urushi….
Applying the Shibo-Urushi…
.
5.24.10
Shibo Urushi Wet.
6.10.10
Tsumanuri
After the shibo-urushi has cured, gold powder is applied to the uneven surface. The pen is first thinly lacquered with transparent lacquer, cured for a brief time, then powdered over with gold powder. In this case, 23.5 kt. gold. The layer is then thoroughly cured in the furo prior to the next layer.
6.28.10
Agenuri
After the gold powder layer is applied and fully cured, the Agenuri is applied. This layer consists of multiple layers of transparent lacquer, which is actually a deep translucent yellow-brown. For this project, 5 individual layers were applied, fully curing each layer in between coats. As the lacquer layer gets thicker, the brown color of the layer gets darker until the gold powder is barely visible through the layers. After a thorough curing, they will be ready for sanding to finally reveal the intricate patterning.
.jpg)
7.19.10
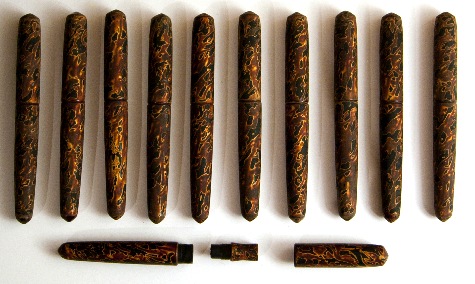
Togi
After the layers of transparent lacquer have fully cured, the entire surface is sanded down carefully to flatten the lacquer into a uniform surface, finally revealing the complex patterns hidden in the layers of lacquer applied until now. The layers must be carefully sanded so that enough of the pattern is revealed while making sure that the upper layers of lacquer are completely ground away. Once the layers have been sanded smooth, the next step is to polish the surface to a high gloss.
8.31.10
Project Completed….